Do you want to know what bluetooth devices are in the range of your raspberry Pi unit and then act accordingly? Now it’s easier than ever before because with version 0.1.3 rhiot comes with bunch of new IoT components and one of them is Camel Bluetooth component which will allow you to list bluetooth devices working in surrounding area. There is also possibility to list services of given device if you want to know how to interact with it.
Camel Bluetooth component is a wrapper around bluecove library. To work properly it require OS packages for handling bluetooth devices. By default it supports Ubuntu and Raspbian by installing libbluetooth-dev and blueman packages. With some configuration you can run it on OSX as well, please refer to Installation section. You will also need to set dedicated installer (io.rhiot.utils.install.BrewInstaller) when working with OSX.
Create scanning endpoint
Following example demonstrate how easy it is to expose REST endpoint which will trigger bluetooth scanner. This code can be run on both pc and raspberry pi:
restConfiguration()
    .component("netty4-http")
    .host("0.0.0.0")
    .port(8081)
    .bindingMode(RestBindingMode.json);

rest("/api/devices")
    .get()
    .route()
    .to("bluetooth://scan?serviceDiscovery=true");
In above snipped we are doing two things, configuring netty4 component by setting host, port and binding mode. With binding mode set to json there is automatic conversion of json content to and from POJOs for all incoming and outgoing messages. Then GET endpoint was created with the /api/devices URI.
Run application:
java -jar target/scanner-pc-1.0-SNAPSHOT.jarthen
curl http://localhost:8081/api/devicesand formatted response should look like this:
[
  {
    "name": "arek",
    "address": "44D4E0AAA2B1",
    "bluetoothServices": [
      {
        "name": "Advanced Audio",
        "url": "btl2cap://44D4E0AAA2B1:0019;authenticate=false;encrypt=false;master=false"
      },
      {
        "name": "OBEX Object Push",
        "url": "btgoep://44D4E0AAA2B1:12;authenticate=false;encrypt=false;master=false"
      },
      {
        "name": "Headset Gateway",
        "url": "btspp://44D4E0AAA2B1:2;authenticate=false;encrypt=false;master=false"
      },
      {
        "name": "Handsfree Gateway",
        "url": "btspp://44D4E0AAA2B1:3;authenticate=false;encrypt=false;master=false"
      },
      {
        "name": "OBEX Phonebook Access Server",
        "url": "btgoep://44D4E0AAA2B1:19;authenticate=false;encrypt=false;master=false"
      },
      {
        "name": "AV Remote Control Target",
        "url": "btl2cap://44D4E0AAA2B1:0017;authenticate=false;encrypt=false;master=false"
      },
      {
        "name": "AAS",
        "url": "btspp://44D4E0AAA2B1:4;authenticate=false;encrypt=false;master=false"
      },
      {
        "name": "Android Network Access Point",
        "url": "btl2cap://44D4E0AAA2B1:000f;authenticate=false;encrypt=false;master=false"
      }
    ]
  }
]
Bluetooth scanner on Raspberry Pi
Let’s get to the point and see example running on Raspberry Pi. Consider following scenario:
- Each time scanning is triggered blink yellow LED to indicate that application is running.
- Search device by it’s name.
- If device if found turn on geen LED
- If device is not found turn red LED
Note: for 3 and 4 only one LED can be on.
Wiring
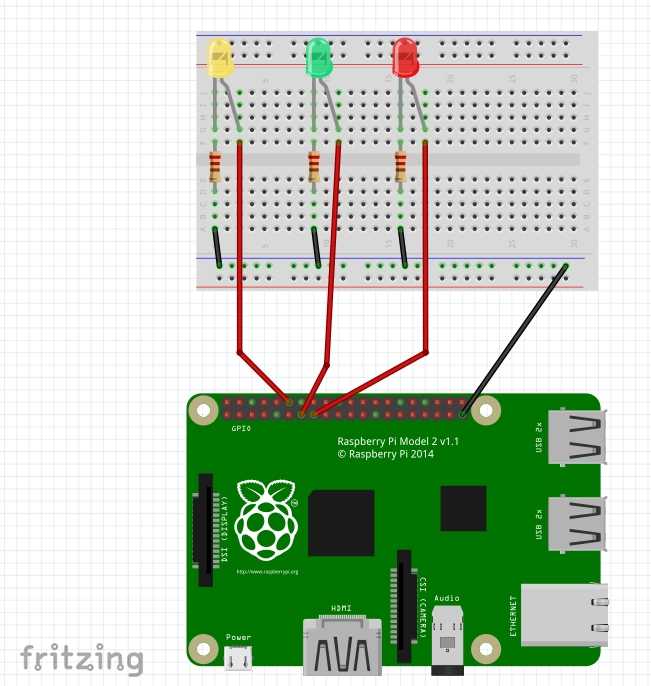
To assemble this schematic you will require:
- 1 Raspberry Pi B+ (or 2)
- 1 Breadbord
- 3 LEDs
- 3 220 ohms resistors
- 7 Wires
And here is the code to run on Raspberry Pi:
private static class ScannerRoute extends RouteBuilder {

    @Override
    public void configure() throws Exception {
        from("bluetooth://scan?consumer.delay=1000")
                .to("pi4j-gpio://1?mode=DIGITAL_OUTPUT&state=LOW&action=BLINK")
                .choice()
                .when(deviceWithName(DEVICE_NAME))
                    .process(p -> p.getIn().setHeader(DEVICE_FOUND, true))
                .otherwise()
                    .process(p -> p.getIn().setHeader(DEVICE_NOT_FOUND, true))
                .end()
                .multicast().to("direct:green", "direct:red");

        from("direct:green")
                .process(exchange -> checkHeaderAndSetAction(DEVICE_FOUND, exchange))
                .to("pi4j-gpio://2?mode=DIGITAL_OUTPUT&state=LOW");

        from("direct:red")
                .process(exchange -> checkHeaderAndSetAction(DEVICE_NOT_FOUND, exchange))
                .to("pi4j-gpio://3?mode=DIGITAL_OUTPUT&state=LOW");
    }

    private void checkHeaderAndSetAction(String headerKey, Exchange exchange) {
        if (exchange.getIn().getHeader(headerKey) != null) {
            exchange.getIn().setHeader(Pi4jConstants.CAMEL_RBPI_PIN_ACTION, GPIOAction.HIGH);
        } else {
            exchange.getIn().setHeader(Pi4jConstants.CAMEL_RBPI_PIN_ACTION, GPIOAction.LOW);
        }
    }
}
With this route few EIP were used but I won’t explain them here as it’s out of the scope of this post. The flow is following:
- Consume results of a scanning.
- Blink yellow LED.
- Using predefined
Predicatecheck if we found device with given name. - Add extra header to message if device was found.
- Add extra header to message if device was not found.
- Route message to multiple endpoints.
- Examine message headers and depending on what you have found change pin action.
Final result
Source code can be found here.
To build all modules you just need to execute from project directory
./mvnw clean installnotice that I’m writing maven pom in groovy so if you want you can convert pom.groovy to pom.xml with following command
./mvnw io.takari.polyglot:polyglot-translate-plugin:translate